Camera Settings for the April 2024 Total Solar Eclipse
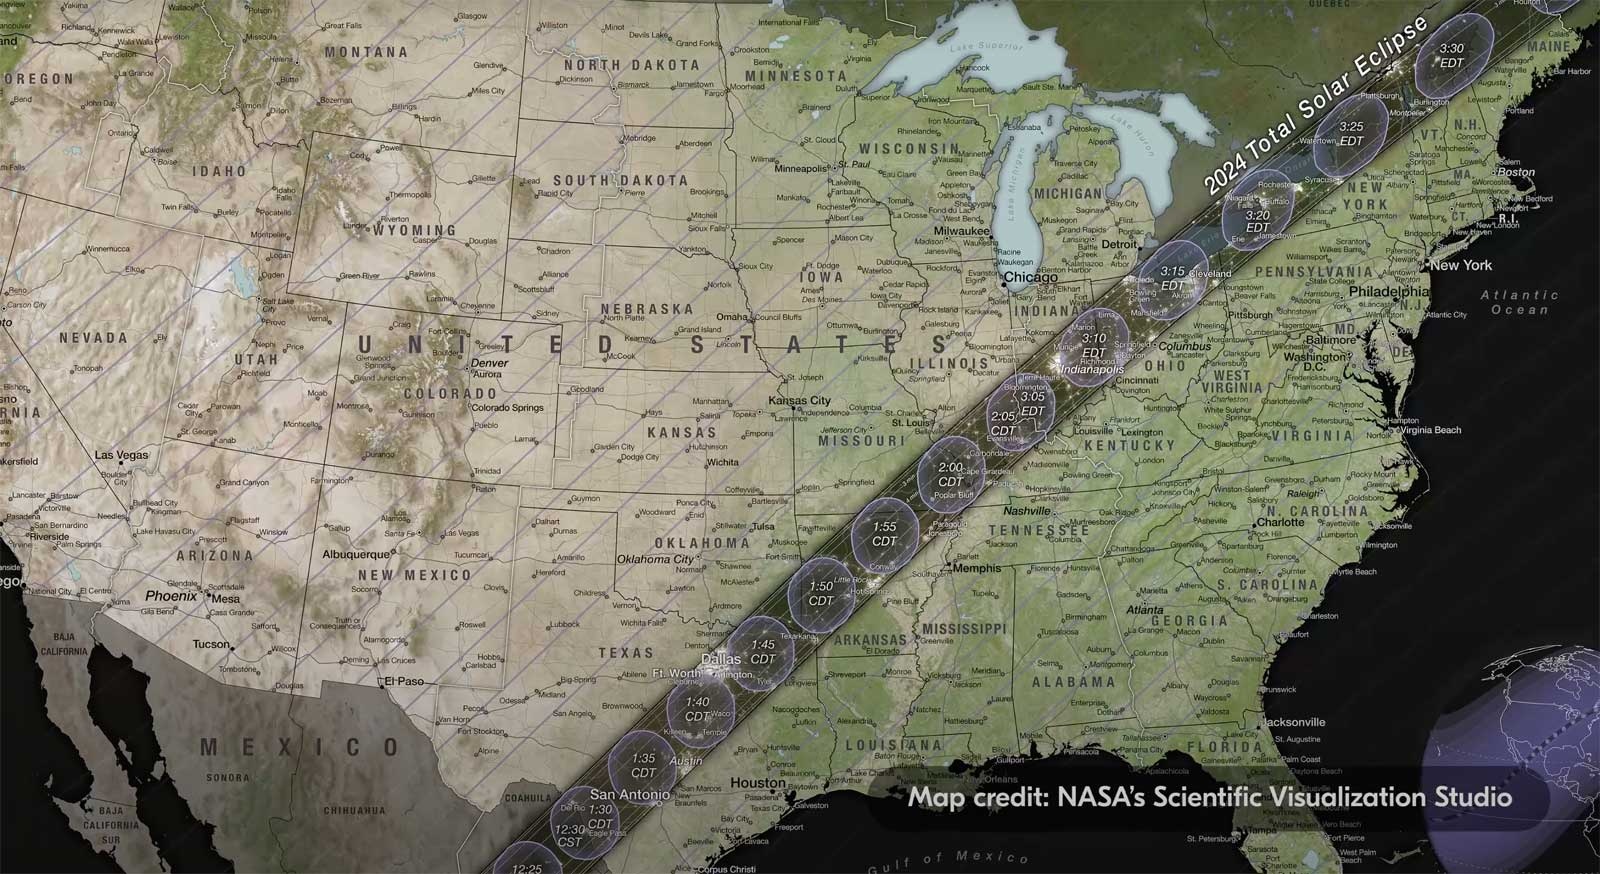
The eclipse will traverse the continental US as well as some parts of Mexico and Canada and the next time we can expect a total solar eclipse’s path to travel across the USA will be Aug. 23, 2044, so you’ll want to get out and photograph this one!
For those who are going to be traveling to—or are lucky enough to live in—the path of totality, you’ll want to make sure you fully understand the camera settings that will make sense to start with and what adjustments you may be making during the actual eclipse. Very helpful if this is your first time photographing a total solar eclipse!
These settings should be considered as more of guidelines, rather than exact figures, but use them as your starting point and then adjust from there. Various factors such as what specific moment of the eclipse is occurring, cloud cover, solar filter density, and available aperture will all play an important role in your settings.
Let’s break down our settings for four different parts of the eclipse. These include the partial eclipse, the diamond ring effect, Baily’s beads and totality.
The first step to getting a correct exposure is to make sure that you have your solar filter on your lens before ever pointing your camera towards the sun. Once your filter is properly attached, and your camera mounted on a sturdy tripod, you’ll be able to frame up your shot and start adjusting your settings.
If you’re accustomed to shooting RAW NEF format images, you’ll definitely want to do so for this event, however if you’ve only ever shot in JPEG then stick to what you’re familiar with.
Partial Eclipse Settings
For images that are taken during the partial eclipse, your shutter speed is going to be your most important factor. I recommend starting at around 1/1000 second but this will vary depending on the density of your filter.
No matter what phase of the partial eclipse you are in, the sun will not change in brightness by much, so your settings will remain the same throughout most of the event, except totality. Now due to the movement of the Earth and Moon, and even wind, I do recommend a faster shutter speed rather than a slower one.
With the sun putting off an abundance of light, your ISO can remain quite low, somewhere around 200-400 ISO.
Now that you have your shutter speed and ISO set, you can use spot metering or if your camera has highlight weighted metering, use it, to meter off of the sun and get your aperture setting. Considering that the eclipse is taking place thousands of miles away, you won’t be too worried about depth of field here. I typically try to be around f/8.
I also recommend utilizing manual focus with focus peaking ON if your camera has that functionality to make sure your focus is as tack sharp as possible. This is something that you can practice weeks before the eclipse to become familiar with manually focusing the lens using focus peaking.
As totality approaches, there are two moments you don’t want to miss out on. These are Baily’s Beads, and the Diamond Ring, and both happen very quickly.
You’ll still need to keep your solar filter on for these moments even though much of the light has diminished.
Diamond Ring Effect
For the Diamond Ring, which is seen as the moon almost totally covers the sun, I recommend being around 1/60 second to help create that dramatic shining effect.
Baily’s Beads
For Baily’s Beads, which is seen at the last moment before totality when you can still see the sun through gaps in the terrain of the moon, I recommend having your camera set to 1/1000 second and shooting on continuous high. This moment happens within just seconds, so press that shutter down and rattle off as many frames as you can to ensure you don’t miss the magic moment.
Typically the diamond ring effect will occur first, and then Baily’s Beads. As these both happen extremely close together, it may be beneficial to focus on photographing one or the other if you only have one camera body.
Totality Phase of the Solar Eclipse
Now as we move into the most amazing part of the eclipse, full totality, we will need to be quick to adjust our settings. Our first step will be to remove our solar filter as it’s not needed during the totality phase.
As day turns to night, you’ll need to let in more light. It is highly recommended you bracket various shutter speeds throughout totality. By bracketing, you give yourself two options: the first is to be able to choose which exposure you like best if you’d like to just use a single shot, the second is to be able to create an HDR exposure of the eclipse by combining a set of images. Your ISO can remain low, around 200, and your aperture can float around f/8 to f/9, but you will want to try various shutter speeds from 1/1000 second to 1 second to get different creative looks.
Depending on your focal length, as you get into a slower shutter speed, you may notice some motion blur because of the movement of the moon. If that’s the case, set your shutter speed back to a faster speed and compensate by increasing your ISO.
As totality ends, make sure to put your solar filter back onto your lens as you continue shooting the second half of the eclipse as it enters the last partial phase.
Now remember, these settings are just guidelines. I highly recommend practicing shooting the sun on the days prior to the eclipse to get a feel for where you should be. Also, if there are any thin clouds in the sky in front of the eclipse, you may need to let in more light by increasing your ISO.
You absolutely must protect your camera’s sensor by utilizing a solar filter on your lens. And you also need to wear appropriate solar glasses to protect your eyes. Neither a regular ND filter nor regular sunglasses will be strong enough to protect your camera or eyes.
The only time it is safe to either view a solar eclipse with your eyes or by looking through the camera without a filter is during the totality phase. All partial phases of the solar eclipse need to be viewed through solar glasses or a camera/lens that has a solar filter on the lens.
Solar Filters are a must!
You absolutely must protect your camera’s sensor by utilizing a solar filter on your lens. And you also need to wear appropriate solar glasses to protect your eyes. Neither a regular ND filter nor regular sunglasses will be strong enough to protect your camera or eyes.
The only time it is safe to either view a solar eclipse with your eyes or by looking through the camera without a filter is during the totality phase. All partial phases of the solar eclipse need to be viewed through solar glasses or a camera/lens that has a solar filter on the lens.
The first step in capturing amazing eclipse photos is being prepared with the correct gear. The second step is figuring out your exposure and other settings. I hope this video helps you build confidence in your settings. Stay tuned for an additional video and article on compositional ideas for your eclipse imagery.
Mike Mezeul II is a Nikon Ambassador. He is a photographer and photojournalist addicted to storytelling and adventure. He's photographed landscapes, professional sports, natural disasters, concerts, air-to-air aerial photography and more.


